
by Brian Plocharczyk 
The last few years I have been approached by a large number of my fellow actors, and voice-over students about whether or not they really need to set up a home voice-over studio and how to do it.
The quick answer is yes you need one, but what exactly that means can vary greatly. It drives me insane when I see fellow professionals running off to a corner of a noisy room to record into their iPhone ear buds. Yes occasionally the current pace of the commercial VO world requires that you get an audition in NOW, and in those cases yes, maybe you need to improvise and record on the go. But in most cases, you will have at least a few hours to get home and record. Many times, you’ll have at least a day to prepare and send in your submission. It is possible to book a voice-over job from a phone recording, but it doesn’t necessarily leave the client with the impression of professionalism. For example, you could book a print or on camera job off of a selfie but if you have a professional head shot, you look like a prepared professional and are more likely to leave a lasting positive impression. The same is true in voice over. With that being said, I’m not a sound engineer. My craft is not sound mixing. I am an actor. My craft is in the performance.
The following represents the extreme basics of setting up a home studio. Please realize that setting up a studio is like buying a vehicle; there is an intended purpose or use balanced against a budget, and personal taste and preferences. In regards to your home studio, not every combination will work for every actor or work load. Be smart about your choices.
A home studio breaks down into these elements: Environment, Microphone, Interface, Software, And Hardware.

1. Environment
Environment is the most important factor in creating your home studio. Your recording environment, or where you are setting up your recording gear should be as quiet and “dead” of a space as possible. A small room with limited exposure to outside sounds and lots of sound absorbing material is ideal. A basement closet away from the street is great. If you have a larger budget many companies sell expensive “pop up” booths that are designed to minimize background noise, or you could build your own with sheets of sound proofing foam which are available on Amazon or from stores like Guitar Center, Sam Ash or Sweet Water. If you are on a tighter budget fear not, there are still lots of options. Leave all of those clothes hanging and throw a comforter over the door. When I started recording in my home studio, I made my own pop up booth out of foam
core board, and a mattress pad that I bought on clearance. Other things to consider are your ablility to stand, move (you know, because we are acting), and read. Is the room cool/warm enough (you might be in there awhile)? Is there enough light? If you are on a budget and have a problem with any of these, think like MacGyver and solve that bad boy.
2. Microphone 
This one is huge too. It’s decision time in this choose your own adventure…USB microphone Or XLR Analog Microphone?
How tech savvy are you? How high quality do you need your sound to be? How much equipment do you want to wrangle? So here is the basic idea: your microphone captures the vibration of your voice and transfers it to electrical impulses, which are then transferred to a digital signal that is recorded by your computer, tablet, or other recording device. USB Microphones do all of that in one device, which plugs straight into your computer via a usb cable. Analog microphones connect via xlr ( 3 pronged cables) and require an interface, a control box, which transfers the electrical impulse to a digital signal. The interface connects to your computer via usb cable. A few of the pro’s /cons: usb mic’s are simple and easy to use and trouble shoot. Some however, do not allow for live monitoring, which means you cannot hear your self through headphones as you record. If you are using a quality analog microphone with a good interface you will get better sound quality and the ability to adjust your recording level and headphone levels from a set of knobs as opposed to inside your recording software. However this set up can take some patience to trouble shoot when having issues.
For usb: I’m a big fan of Blue Microphone Systems; the Snowball, and Yeti (allows live monitoring) are great entry level microphones. The Yeti is now packaged in a pro model, which comes with the ability to record via usb or xlr and yeti studio which comes with recording software. Apogee (Mic+) Shure (MV series) Rode and Audio-technica also make reliable mic’s that a lot of v.o.’s use to record on the go and at home these days.
Expect to spend: $50Snowball- $250 (Apogee Mic +).
For analog: You want a cardioid, condenser studio microphone, smaller diaphragm(Super-cardioid) if you are in a noisier environment, larger if you have a quieter space. Note: There are a lot of different types of mics out there. To simplify the concepts you will see when shopping, you are going to want a mic that is only picking up your voice and not the fire truck 3 blocks away. Cardioid refers to the sound pick up pattern of your mic. Shure has an easy to follow explanation of microphone function and polar patterns here if you want the background.
Expect to spend: You can get a good studio mic for around $200-$250, and can spend upwords of $1600-$2K for some of the Neuman and Sennheiser mics you will see in top studios. Make sure you are buying from a reputable brand and read reviews. For some bargain prices with good quality check out Rode, and AKG. I ended up going with an AKG p420 for my latest revision of my home studio.
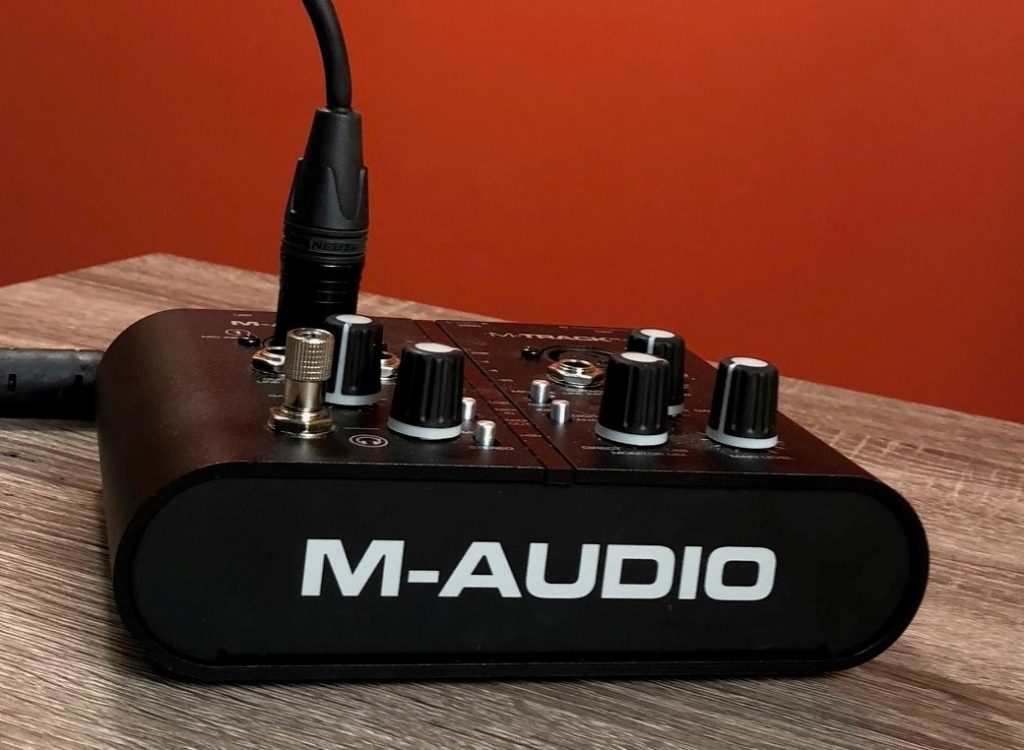 3. Interfaces
That thing that converts the signal remember? Small and simple or large and complex. If you are just recording you, you only need 1 channel, which means, keep it small and simple. Shure Mvi, M-Audio Fast Track and, FocusRight Scarlett, are all brands that I or colleagues have recommended in the past. Note: Take a look at what’s included. Some of these interfaces are now being sold with expensive software included. Expect to spend: $60- $150, more if you want multiple channels.
4. Software
Ok… this one is totally choose your own adventure. I feel like there are a million software options out there and as long as you can edit and convert to different file types, ie. mp3/wav, adjust basic recording levels etc.. it only comes down to finding a layout/functionality you like. Pro-tools is what the big studio’s use but that is super expensive, same with Adobe audition and some of the other big programs. You can get free trials- but eventually you will have to pay the licensing fees. Audacity is a popular low cost option but I don’t find it particularly user friendly/reliable. Sound forge is an option several colleagues stand by. Honestly, If you have a newer mac the latest versions of Garage band have come a long way to catch up to some of these other programs… Another option and one of my favorites, especially for recording on the go is Twisted Wave. If you are going with a Blue “Studio” or and interface that comes with recording software see what you have and play before you invest any more $$$
Expect to spend $0-$300 a year
5. Hardware:
Do you own a desk top or laptop computer that was manufactured post Y2K? Great you should be set! There are even ways out there to use your iPad and smartphone to record your hi -quality audio, but again I’ll save that for another post.
Other Essentials you will need:

Studio head phones: Expect to Spend: $40-$100
A Pop Filter: Keep those p’s from popping. Expect to Spend: $10-$40
Music Stand/Mic Stand: Make sure you check the max extension if you are taller. Expect to Spend: $20-$40
Optional Items:
Studio Speakers: If you want to take your headphones off and share your work with your roommates: Expect to Spend: $80-$500
Shock mount- keeps your microphone from picking up vibrations from the desk or floor you have your stand mounted on. Some Microphones include this.
Expect to spend:$10- $60
Cables and Adapters: Expect to Spend:??? It all depends on what equipment you are going with. When in doubt,consult google. Chances are there is an adapter for whatever you need.